Saturday, May 7, 2011

Slow-Cooked Broccoli Soup with Garlic and Olive Oil

For the first few months of this year, I got on a soup kick with my crock pot, trying out different soups from Not Your Mother's Slow Cooker Cookbook and The Gourmet Slow Cooker: Simple and Sophisticated Meals from Around the World.  The recipe I made on February 10 was from Not Your Mother's Slow Cooker Cookbook: Slow-Cooked Broccoli Soup with Garlic and Olive Oil.  The cookbook describes this recipe as an "Italian peasant soup," so I figured it must be cheap to make!

It was also really easy to make because after chopping the broccoli florets and thinly slicing the stems, you just throw all the other ingredients into the slow cooker: olive oil, sliced garlic, fresh thyme (the recipe says you can use fresh or dried, thyme or marjoram -- I chose to use fresh thyme), vegetable or chicken broth, dry white wine, and lemon juice.  Then, you mix it all together and cook on low for five to six hours.  You really can't get any easier than that!

I actually made the soup twice, once with the chicken broth and once with vegetable broth, because I bought too much broccoli the first time.  It ended up being a pretty good soup both times.  Now, after it's done cooking, you're supposed to mash the broccoli against the side, but honestly after I did that once or twice I said, "This is going to take too long, forget it."  It didn't really matter all that much that I hadn't mashed the broccoli.  But, I would like to try this soup with the immersion blender that my fiance and I received as a wedding gift, which the cookbook lists as another option if you want a smoother soup.

Before serving the soup, you season it with salt and pepper to taste and top it with grated Parmesan cheese.  Overall, I really enjoyed this soup, but I found it necessary to add a bunch of the Parmesan cheese to really get a good flavor -- it's a bit bland otherwise.  The other complaint I had is that you don't get enough protein with this meal and even with a large salad (as you see to the right), I found myself still hungry an hour or so after eating this soup.  I think it might be better as an appetizer than as a full meal.

Now, this recipe says that it serves six and I got exactly six servings out of each batch I made.  Using the chicken broth, that comes out to about 238 calories per serving; using the vegetable broth, 215 calories per serving.  I'd also estimate that I added 75-90 calories per serving with the cheese that I added, but since I didn't measure exactly, I can't really tell.  But actually, the largest calorie item is the olive oil!

In terms of cost, since I had many of the ingredients already, this fit really well into my budget.  I already had olive oil, garlic, chicken broth, and lemon on hand, and I had the Parmesan cheese and fresh thyme left over from the Tuscan White Bean Soup.  So, it actually only cost me about $1.46 per serving for the chicken broth version and $2.33 per serving for the vegetable broth version!  Of course, those numbers don't really give an accurate picture of the cost of the soup as a whole.  I'd estimate $3.79 per serving for the chicken broth version and $4.12 per serving for the vegetable broth version!  Overall, not bad on a budget if you're eating this as a meal, but I'd recommend only having it as an appetizer or side.

Saturday, April 30, 2011

Southwestern Salmon Po' Boys

So, I was originally planning to post about this last Friday, a fish dish in honor of Good Friday, but the internet was out all weekend, so no such luck.

On April 19, the last week of Lent, I decided to try out one of the fish dishes in my crock pot cookbooks.  I've avoided doing these before because fish cooks quickly in the crock pot, so it's not one of those easy ones where you can turn it on before you leave for the day and come back to a fully cooked meal.  But, since it cooks so quickly, fish recipes are ones that you can make when you get home (as long as you don't get home too late).  In order to make this recipe, I made an effort to leave school right at 5:00 p.m. so we could eat around 7:00-ish.

I had picked the Southwestern Salmon Po' Boys recipe from the Crock-Pot Incredibly Easy Recipes cookbook, but I decided to make a half recipe because it says that it serves four and I'm not a big fan of leftover fish.  I did some of the prep work the night before: slicing the red and green bell pepper and onion.  On the way home from school I stopped to get salmon so it would be as fresh as possible.  Now, I'm in the Midwest and going to get the fish was the first time I really missed living on a coast.  During Lent especially, my mom used to go to a nearby fish market to pick up fresh fish on the way home from work for our dinner.  Although our grocery store gets shipments of fish every day, it's just not quite the same.

Anyway, you season the salmon with salt, pepper, and "zesty Southwest chipotle seasoning."  That latter ingredient was difficult to find because there was no "chipotle" seasoning.  What I ended up getting was a Southwest seasoning that said it had chipotle peppers in it.  So after seasoning the salmon, you layer it in the crock pot on top of the sliced veggies, then add Italian dressing, another layer of veggies, and some water.  It only cooks for one and a half hours on high.  (The image to the left is actually what it looked like when it was finished cooking.)

While that was cooking, I prepped the toppings for the po' boys.  I sliced and toasted French bread and made "chipotle mayonnaise."  Now, the recipe calls for "chipotle mayonnaise" as one of the ingredients, but I found nothing even remotely close in the grocery store.  The recipe suggests combining plain mayonnaise with adobo sauce if you can't find it in the grocery store and I was lucky that I had purchased peppers in adobo sauce for another recipe the week before so I could make my own chipotle mayonnaise without any extra cost.

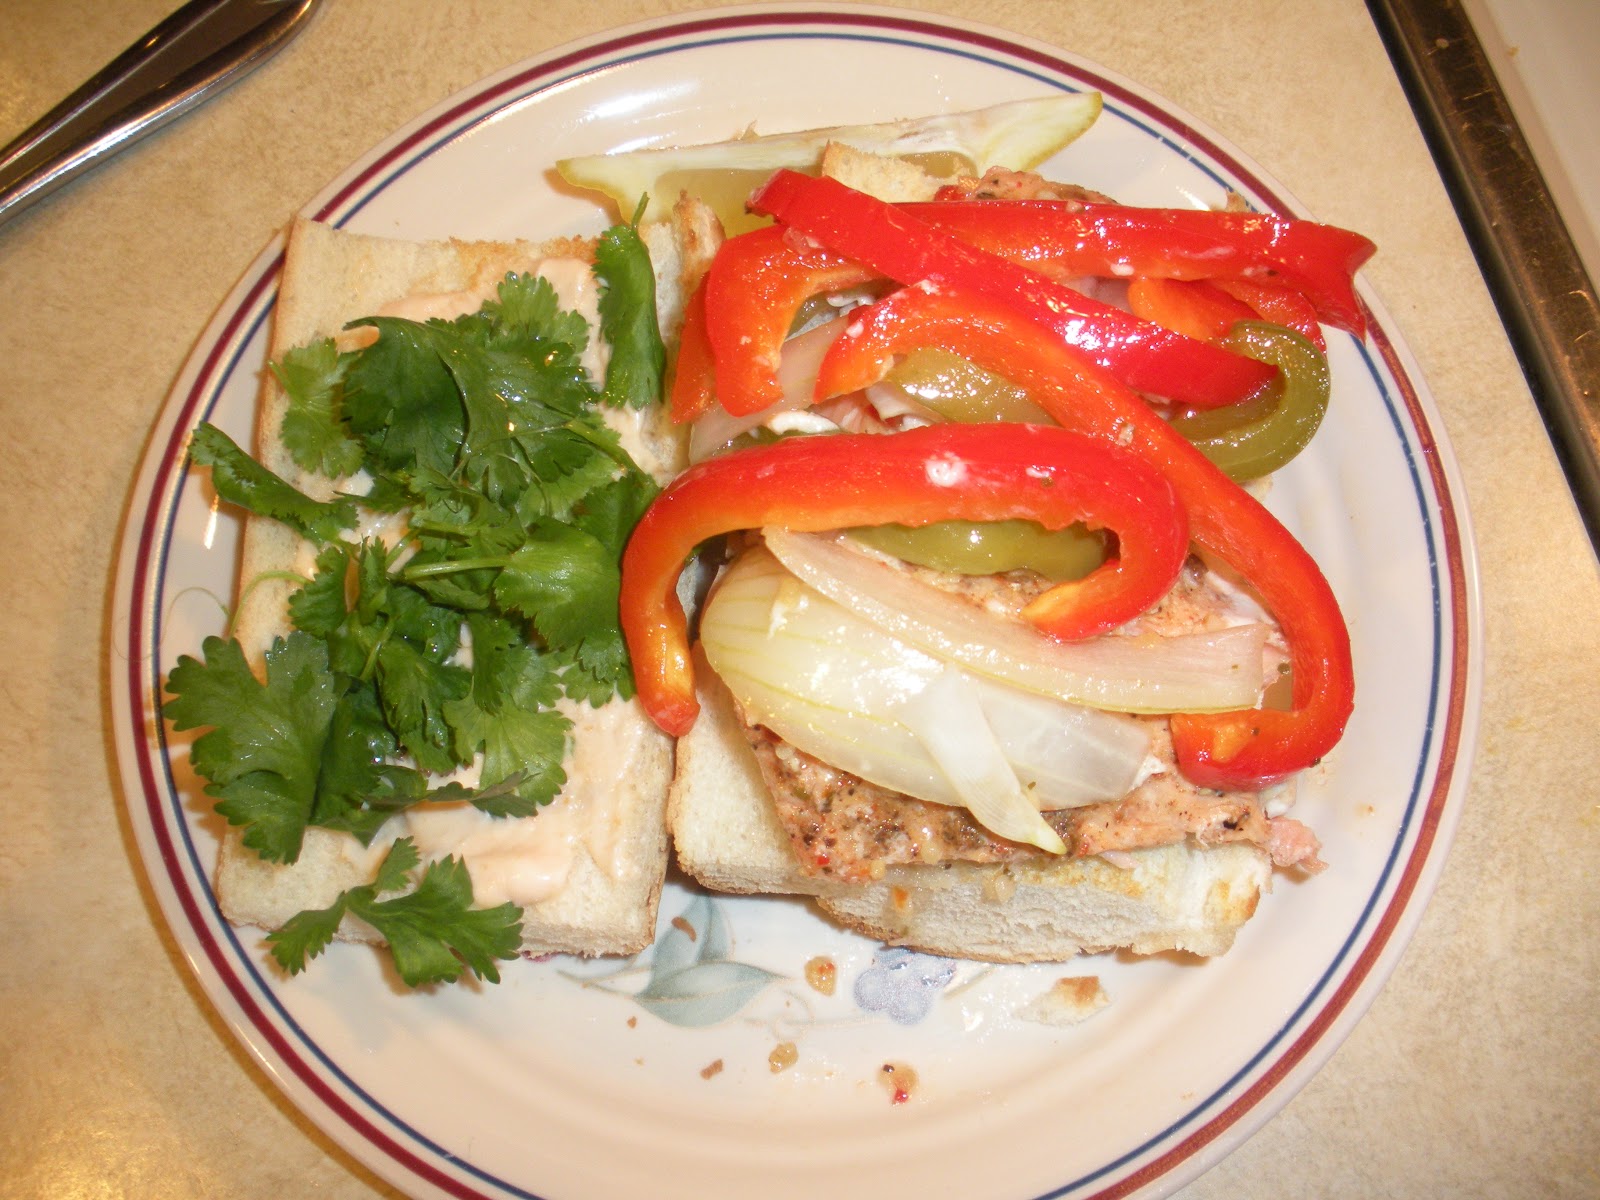
After the fish is done cooking, you just have to take it out and assemble the sandwiches.  You spread the chipotle mayonnaise on the bread and add some cilantro.  I removed the skin of the fish before I added it to the sandwich (which is what I was doing in this picture to the left).  You spoon some of the cooking liquid on the rolls, then add the fish and vegetables.  The recipe finally says to "serve with lemon wedge."

Now, I just have to say that this was one of the best things I've done in the crock pot.  I actually regret not trying some of these fish recipes before because the fish cooked perfectly in the crock pot!  And, if you're like me, a little squeamish about your fish being cooked right, this is a great way to do it.  But, as I've come to expect from this cookbook, I got more servings than expected out of this recipe.  Since I halved the recipe, I expected to get two servings, one for me and one for my roommate, but we ended up with three.  I reheated the third serving and had it the next night for dinner and it was still good, but I didn't bother making the sandwich over again.

The cool thing about this recipe, too, is that this is one of the first times where my dish actually resembles the picture in the book!  You can compare the sandwich I made above to the more expertly assembled one to the left (apologies for the flash glare--that was the picture that showed the colors the best), but, most importantly, the food that I made was the same vibrant color used in the image (normally the color in my food looks more bland).

Now, calculating the calories for this will be a little difficult because the amount of Italian dressing that you put in the recipe is not the amount that you actually end up eating.  So my initial calculation was really high, 980 calories per serving, including all the bread and sandwich toppings.  But, in actuality, it's probably closer to 842 calories as a sandwich and 473 for just the fish and veggies by itself (how I ate the leftovers).  So, as published, this recipe is a really high-calorie meal, but if you were to just cook the fish and veggies and eat them without the sandwich fixings, it's not a bad choice.  And even with the sandwich toppings, you could cut calories by using less of the mayo and a lower-calorie roll.  In terms of cost, it seems pretty expensive at first glance.  I mean, I paid $27.40 for the ingredients (about $9.13 per serving!) and I didn't have to get the mayo or adobo sauce!  The fish was the big ticket item at $11.27 for 10 oz, and that is unavoidable, but the Southwest seasoning was also $7.49!  Taking that item off because it's not like I used the whole (big!) jar of seasoning, it ends up being only about $6.34 per serving which is not bad at all for a meal, but definitely not as cheap as some of the other dishes I've made in the crock pot.

Regardless, I've learned how yummy fish cooked in the crock pot can be and will definitely be trying more of these recipes in the future!

Saturday, April 16, 2011

Tuscan White Bean Soup

One of the most natural things to make in the crock pot is soup.  For the graduate student, making soup in the crock pot is especially good: both because you can make it once and have meals for the whole week and because making your own soup is more healthy than getting canned--especially if you don't add much salt.  When I first got back from winter break, on January 18, I made the Tuscan White Bean Soup from The Gourmet Slow Cooker: Simple and Sophisticated Meals from Around the World cookbook.  And actually, another good thing about soup is that it's great to have when you're sick.  I came back from winter break with a cold so the first thing I thought of doing was making soup in the crock pot.

This recipe was perfect for a graduate student lifestyle because most of the prep work can be done the night before, allowing you to just throw everything together in the morning before heading off to school.  The night before you do have to rinse and sort through the beans, then leave them to soak overnight.  Once you've prepared the beans, you can chop all of the other ingredients and stick them in tupperware over night.  Now, apparently if you don't want to soak your beans overnight, you can actually cook them in water in the crock pot for two hours on high to get the same effect.  However, after my experience with the baked beans, I always make sure to soak the beans overnight.  (Note: I understand that this is an irrational connection to make because I did soak the beans overnight when I made baked beans, but that experience still has me a little paranoid.)

Now, all you need to do in the morning is drain the beans and then throw everything together.  I added the beans first, then water (no broth needed, which saves a bit of money for the grad student!), then all the ingredients I chopped the night before: carrots, onion, celery, and garlic.  Finally, you add one sprig of thyme and a can of crushed tomatoes.  Then just turn it on low (for six to eight hours) and you'll come home to some great soup!

This is what it looked like before I turned it on.
And this is what it looked like when it was done cooking.

Now, the cool thing about this recipe is that it does not make you add salt when you're cooking it.  Salt is added, to taste, after the soup is done cooking.  Of course, I didn't add any salt to my recipe.  So it was easy enough to just take the sprig of thyme out and serve the soup, right when I got home.  The soup is garnished with 1 tablesppon olive oil (per serving) and "a sprinkle of [freshly grated Parmigiano-Reggiano] cheese."  Now, as you can see from the image, I may have added more than a sprinkle which ultimately would add to my calorie count, but the cheese was so tasty, I couldn't resist!  In fact, in my cookbook I noted that the recipe was "yummy, especially with the cheese as garnish."  I served it with a large salad and had a great dinner, though you could, of course, add some bread on the side if you wanted something more substantial.

The recipe says that this will serve four to six and I definitely got six servings out of it.  I've actually found that this cookbook is a little more reliable in terms of servings than some of the other crock pot cookbooks I have.  That means that the soup itself is only about 170 calories.  With the garnish you'll add a bit more though because the tablespoon of olive oil is about 120 calories in itself and a tablespoon of the cheese (and I definitely used at least that much) is another 20 calories.  So, for each serving I ate, it was probably about 310 calories.  That seems high for a soup, but if you're having it as your main course with just a salad, you'll be in good shape if you're watching calories (and we all know that the time spent sitting in our cubicles or at home in front of a computer doesn't burn many calories!).  In terms of cost, this was really good on my budget!  When I went shopping, I already had garlic, canned crushed tomatoes, and olive oil at home, so I didn't need to buy those things.  So for this recipe, I only actually paid a little over $2.00 per serving.  The big expense, mostly because I was afraid it would go bad before I used it again, was the thyme at $2.59, which seems like a lot if you're only using one sprig!  Of course, I actually ended up using it in other recipes before it went bad so it ended up not being as big of an expense.  The big expense overall would be the olive oil, but that tends to be an item that you normally have on hand in your kitchen.  I normally get the big jars of olive oil because it's a better deal overall, but then you'd end up paying up to $20.00 (or more) and I'm not going to use that in my calculations because it would throw it off.  You can get smaller jars for around $5.99 and I would assume that if someone were getting olive oil just for this recipe, that's the size that they'd get.  Using that, it comes out to about $3.28 per serving--not too bad at all for a week's worth of dinners on a grad student budget!

Sunday, April 10, 2011

Pumpkin-Cranberry Custard

I'm going to start off by apologizing for neglecting this blog for so long.  It feels like recently that's how I've started off every single post, but one of the difficulties of the grad student lifestyle is that your life has a tendency to get busy and so other things, like this blog or, say, replying to e-mails, get put to the side.

In fact, I have a tendency to get so busy with schoolwork that my attention to other things ends up somewhat lacking, which is what I'm going to illustrate in this post.  Before I even start, let me explain that this dish was a failure.  I didn't even realize how much of a failure, however, until I reread the recipe and saw what my mistake was.  What happened was, on December 12, I decided to try out one of the desserts in my Crock-Pot Incredibly Easy Recipes cookbook for my roommate and one of her friends because I was leaving to go see my family in Massachusetts soon and therefore I didn't want to make a whole crock pot meal.

The great thing about this recipe is that it is in the "One-Step Dishes" section of the cookbook.  All you have to do is basically throw the ingredients in and mix them all together.  In this mix, as you can see to the right, the recipe calls for pumpkin pie filling, evaporated milk, dried cranberries, and eggs.  If you're looking closely at all the pictures, you might already be able to guess where I went wrong in this recipe.  Anyway, you stir the ingredients all together and cook it on high for four to four and a half hours.

This is what it looked like after stirring.

And this is what it looked like after cooking on low.

The recipe recommends two optional toppings: whipped cream and "crushed or whole gingersnap cookies."  Now, since we're talking about my lack of attention in this recipe, I should add that it was only just now as I'm looking at the recipe to write this blog post, that I realized the recipe says that the cookies can be crushed or whole.  I, as you can see from the image to the left, crushed them.  However, that said, I would probably crush them again were I to try to make this recipe again because I like the way you get some gingersnap with your custard on every bite.

So, were you able to figure out what I did wrong?  I'll give you a hint: while eating the custard, we realized that it didn't really taste sweet enough.  It was edible, for sure, but only if you drenched it with whipped cream (which was sweetened).  If you can figure out what I did wrong, leave a comment below.  I'm curious to see who the first person to get it will be... and it shouldn't be hard to figure out from the images I posted and what I wrote.

Unfortunately, I can't figure out the cost or calories per serving this time because we only ate the three servings before I left to see my family.  Thus, although the recipe says it makes four to six servings, I cannot judge the accuracy of that claim (and in this cookbook there is a tendency for the recipes to make much more than they say they do).  In terms of cost, none of the ingredients are too expensive.  I actually bought Craisins at the store and they were on sale (2 for $5.00) before realizing when I got home that I already had dried cranberries from Trader Joe's.  The remaining ingredients were just over $6.00, though I already had eggs and my roommate already had gingersnaps.  You can probably get everything you need for this dessert for around $10.00, so you could probably estimate around $2.00/serving.

So my overall thoughts on this recipe: it might not be a bad dessert.  It was bad how I made it because I wasn't paying enough attention due to end-of-the-semester business, but I think if one were to really follow the directions it would be really good.  Maybe I'll just have to try it again next holiday season...

Sunday, March 6, 2011

Cock-a-Leekie Soup

One of the pitfalls of being a graduate student is having weeks where your work overload just becomes too much.  Last week was one of those weeks.  (You know you have a problem when the head of the department tells you that you look tired and stressed.)  So, unfortunately, I had to skip updating the blog.

"I'm making Cock-a-Leekie soup."  "What???"  "Cock-a-Leekie soup."  "Watch your mouth!"

Back in November, I made Cock-a-Leekie soup, one that I expected to be great for the graduate student lifestyle because the Not Your Mother's Slow Cooker Cookbook says that it is "as economical as it is delicious."  There's a lot of chopping to do to prep this soup so I highly recommend doing it the night before and sticking it in the fridge (as you can see I did).

I chopped the leeks, potatoes, onion and boneless, skinless chicken breasts ahead of time (of course, the recipe called for boneless, skinless chicken thighs, but as you know, I prefer chicken breasts).  So, in the morning I was able to just throw everything into the crock pot.  To the ingredients that I prepped the night before, I added barley, parsley, and a bay leaf.  The recipe calls for a Turkish bay leaf or half of a California bay leaf, but I honestly didn't care enough about the difference in order to care to buy new bay leafs and I actually just threw in one whole bay leaf from the grocery store.

You can add either chicken broth or water to this recipe.  In this case, I already had some chicken broth from a previous recipe, so I used that.  Honestly, if I hadn't already had the chicken broth, I probably would have used water, but I'm sure the chicken broth adds a lot of flavor so it all worked out in this case.  After adding the broth or water you just stir it all together and let it cook on low for 6 to 8 hours.  Thus, it's a perfect one to turn on when you're heading out the door and then just turn off when you get home in the evening.

This is what the soup looked like before I turned it on.

And this is what it looked like after cooking.

Once the soup is done cooking, you add salt and pepper (though I did not add the salt) and stir it again.  You're supposed to serve it with a splash of Worcestershire sauce, and topped with chopped prunes and parsley.  Now, the chopped parsley as a garnish didn't last as long as the soup itself did, but having it with just the prunes and the Worcestershire sauce was still good.  The soup, by itself, does not have all that much flavor, but the Worcestershire sauce adds a kick to it and the prunes add some sweetness.  I ended up adding more and more of each every time I served it and they became less of a garnish and more of the part of the soup.

So, in terms of the original claim that the soup is "as economical as it is delicious," I would agree with the "delicious" claim, but only as long as it is served with the Worcestershire sauce and prunes.  The cookbook says that it serves 4 to 5, but I definitely got a lot more servings out of it.  It was a long time ago, but I think I actually ended up getting 8 servings overall.  So, in terms of cost, the only really expensive item is the chicken, especially if you go with store brands for the bay leaves, chicken broth, prunes, and Worcestershire sauce.  Thus, even counting in the chicken broth and the items that I did not have to buy because I already had them, this comes out to about $3.00/serving.  (Though, as I cooked it, it was only about $2.12/serving!)  So, I guess Beth Hensperger and Julie Kaufmann are right to claim that it is "as economical as it is delicious."  Health-wise, the soup comes out to about 185 calories per serving before you add in the prunes and Worcestershire sauce, which would add probably 65-85 more calories per serving, depending on how generous you are with the prunes.  Either way, it's under 300 calories per serving, and makes for a filling meal alongside a salad.