Monday, July 4, 2011

Southern-Style Barbecue Green Beans with Bacon

Seriously.  "Southern-Style Barbecue Green Beans with Bacon."  Doesn't that sound like an appropriate side dish for the Fourth of July weekend?  My fiance decided that he wanted to have some of his friends from his nursing program over for a barbecue, so I volunteered to make a side dish.  I thought that I might give baked beans in the crock pot another try, but ultimately decided that green beans + bacon, cooked in barbecue sauce sounded like a good dish to feed nursing students.

This was from the Not Your Mother's Slow Cooker Cookbook, which is quickly becoming one of my favorites (though thanks to bridal shower gifts and such, I now have Italian and Indian slow cooker cookbooks to try... also: how excited am I about this French slow cooker cookbook, due to be released in January 2012).  Since I was planning to go into school to the gym and to work at the library on the day of my fiance's barbecue, we were smart and prepped some of the ingredients the night before.  This recipe is actually set perfectly for a grad student: there's only four steps and if you prep it the night before, and thus eliminate one of the steps, all you have to do the day of is throw everything together in the crock pot.

As you can see from the images, the first step is to cook the bacon and then cook a chopped onion in the remnants of bacon grease.  The step that we skipped is actually the one in between those: "Grease the inside of the slow cooker with some of the bacon drippings."  I thought that it wouldn't be sanitary to leave the grease out in the slow cooker overnight and it wouldn't be smart to refrigerate the slow cooker insert itself, so I decided that since the bacon was going in and we cooked the onion in bacon grease, that would be sufficient.  I also washed all the green beans and snapped off the ends the night before, to make my life easier in the morning.

So, all I had to do when I got up in the morning was to throw the green beans and the onion/bacon mixture (I stored those in the same Tupperware container) and cover it all with barbecue sauce.  In terms of timing, this one is pretty good for an all-day, out-of-the-house cooking, though I think the beans might have been better if they hadn't cooked for as long as they did.  The recipe says to cook them on low for six to seven hours and I found the beans to be a little too limp in the end.

This is what the beans looked like after they were done cooking.

And this is what they looked like after I stirred them... much better, no?

Now, I couldn't even begin to tell you how many servings we got out of this because people just were helping themselves at the barbecue.  I made a double recipe, but a single recipe says that it serves four to six.  So, for the sake of this, let's assume that I got twelve servings total, though I'm sure we got more than that.  So, in terms of cost, I'd estimate this dish to be anywhere from $1.05-$1.25 per serving according to the number of servings estimated by the cookbook.  The range, of course, depends on how cheap certain things are, especially the bacon and the barbecue sauce.  In terms of calories, the big ticket item here is actually the barbecue sauce, making the per serving calorie count about 128.  In reality, it's probably less than that because (a) you don't eat all the barbecue sauce, just the stuff that sticks to the beans and (b) we probably ate smaller servings that the estimated.

So, how was this recipe?  Not bad.  My fiance's assessment is probably what I'm going with: this dish is more barbecue sauce than green beans in terms of taste.  I think that if I ever make it again, I may try diluting the barbecue sauce with some water, going half barbecue sauce and half just water, which may make the taste of the beans stand out a bit more.  I think I'd also probably cook it for less time, so the beans would be crisper and taste more fresh.

Sunday, June 5, 2011

Crock-Baked Beets AND Pollo Colorado

Back in January, I posted about making Soy-Sake Asparagus in the crock pot.  At the end of the post, I mentioned that my friend Roopsi had given me the dual crock pot that I had been coveting.  Well, not long after making that post (January 25), I tried it out for the first time, making both a side dish (Crock-Baked Beets) and a main dish (Pollo Colorado) from the Not Your Mother's Slow Cooker Cookbook.  My pair of recipes in this case might seem a little bizarre, but I was looking for two recipes that both cooked all day and both didn't take very many ingredients so I would be able to turn them on before I went to school and also wouldn't have to spend much money.  The cool thing about the dual crock pot, however, is that you can easily do two recipes that cook for different times -- you just have to be able to be home to start the second recipe whenever that is called for.

As usual, I did most of the prep work the night before.  For the beets, this meant that they had to be scrubbed and the stems trimmed to one inch.  The great thing is that I saved the beet greens and cooked them up later after I had finished the beets.  The beets only need to be wrapped in aluminum foil and then placed in the crock pot, so I wrapped them the night before, but waited until the next morning to put them in the crock pot.  For the pollo colorado (a.k.a. chicken in red chile sauce), I only had to chop some onions and peppers.  The recipe says, "If you are going to eat pollo colorado as a stew, chop the onions and peppers into 3/4-inch pieces.  If you are going to use it as an enchilada, burrito or taco filling, slice the onions and peppers."  I wasn't planning to do either of these things, so I chose to slice them, which I did the night before.

That morning, I assembled the crock pots.  The beets were easy because all I needed to do was put the beets that had been wrapped in aluminum foil into the crock pot.  For the chicken, I had to put the sliced vegetables in first.  Putting this recipe together really showed me what the one drawback to the dual crock pot is: each of the pots is only 2.5 quarts (about half the size of my 4 quart crock pot).  I started adding all the vegetables, quickly realizing that the recipe I was making was designed to be cooked in a crock pot at least the size of the red one that I have.  So, I decided to just make half the recipe, figuring that I could just make the other half once I ate all of this one.

After adding the vegetables to the pollo colorado recipe, the only other ingredients are frozen boneless, skinless chicken breast halves and a can of red chile sauce or enchilada sauce.  Now, the cool thing about the Not Your Mother's Slow Cooker Cookbook is that for sauces that might be difficult to find, they often will provide a recipe for making it yourself.  I didn't do that in this case, but the book has a recipe for a basic red chile sauce just in case.

Each of these recipes was able to cook for about the same amount of time.  The beets say to cook for four to six hours on high, while the chicken was to cook for five to seven hours on low.  As you already know if you've read my blog before, I turned the crock pot on when I left the house in the morning and was able to have dinner when I got home that night -- longer than the allotted time according to the recipes, but I've never had a problem with things overcooking.

When these were done cooking, the beets took a little extra work to finish preparing because you have to take the skin off.  An especially fun task when the beets are as hot as they were coming out of the slow cooker!  Then they are sliced and can be served hot with butter or cold with salad dressing (as I did with some of the leftovers.  Overall, I feel the same way about cooking beets in the crock pot as I do about doing baked potatoes in the crock pot: It doesn't feel like the best use of time because they can be cooked quicker getting the same result.  However, there may be times when it actually is the best use of time to cook them in the crock pot.

For the chicken, the recipe says, "Cut [the chicken] into chunks if you are making a stew; slice or shred it if you are going to be filling tortillas."  As you can see from the picture to the right, I just served myself some chicken.  However, I would not recommend this.  Although this recipe would make some great burrito filling, it is too blah on its own.  Now, the pollo colorado recipe says that it serves 4-5.  I only got 4 servings out of it (after making it a second time to use up the vegetables that I had previously cut), but I also purposely selected smaller pieces of chicken because they fit better in the smaller crock pot.  The beets are supposed to serve four, but I tend to give myself big servings of vegetables, so I only got three out of it.

So, each of my servings of beets were about 105 calories and about $2.00.  That's pricey for a side dish, but I also had to search the produce aisle for the fresh beets so it's obvious that they're not all that common here.  Though, I used to buy them at the farmers' market in Berkeley, California when they were in season at a much better price.  The chicken was only about 237 calories per serving (though if you added it into a burrito, the whole dish would have more).  I paid about $4.12 per serving for the chicken dish, but the bulk of that was the large bag of frozen chicken breasts.  Since most of those were leftover I could probably cut the price for that in half in terms of actual use (making it a much more reasonable $2.87 per serving).

--------------------------------

I apologize for missing the blog for so many weeks.  After the semester ended, I was home visiting my parents and although I brought all the information about the recipes to update my blog, I just didn't have an opportunity!  I should be better over the summer... until August when I'm getting married. :)

Saturday, May 7, 2011

Slow-Cooked Broccoli Soup with Garlic and Olive Oil

For the first few months of this year, I got on a soup kick with my crock pot, trying out different soups from Not Your Mother's Slow Cooker Cookbook and The Gourmet Slow Cooker: Simple and Sophisticated Meals from Around the World.  The recipe I made on February 10 was from Not Your Mother's Slow Cooker Cookbook: Slow-Cooked Broccoli Soup with Garlic and Olive Oil.  The cookbook describes this recipe as an "Italian peasant soup," so I figured it must be cheap to make!

It was also really easy to make because after chopping the broccoli florets and thinly slicing the stems, you just throw all the other ingredients into the slow cooker: olive oil, sliced garlic, fresh thyme (the recipe says you can use fresh or dried, thyme or marjoram -- I chose to use fresh thyme), vegetable or chicken broth, dry white wine, and lemon juice.  Then, you mix it all together and cook on low for five to six hours.  You really can't get any easier than that!

I actually made the soup twice, once with the chicken broth and once with vegetable broth, because I bought too much broccoli the first time.  It ended up being a pretty good soup both times.  Now, after it's done cooking, you're supposed to mash the broccoli against the side, but honestly after I did that once or twice I said, "This is going to take too long, forget it."  It didn't really matter all that much that I hadn't mashed the broccoli.  But, I would like to try this soup with the immersion blender that my fiance and I received as a wedding gift, which the cookbook lists as another option if you want a smoother soup.

Before serving the soup, you season it with salt and pepper to taste and top it with grated Parmesan cheese.  Overall, I really enjoyed this soup, but I found it necessary to add a bunch of the Parmesan cheese to really get a good flavor -- it's a bit bland otherwise.  The other complaint I had is that you don't get enough protein with this meal and even with a large salad (as you see to the right), I found myself still hungry an hour or so after eating this soup.  I think it might be better as an appetizer than as a full meal.

Now, this recipe says that it serves six and I got exactly six servings out of each batch I made.  Using the chicken broth, that comes out to about 238 calories per serving; using the vegetable broth, 215 calories per serving.  I'd also estimate that I added 75-90 calories per serving with the cheese that I added, but since I didn't measure exactly, I can't really tell.  But actually, the largest calorie item is the olive oil!

In terms of cost, since I had many of the ingredients already, this fit really well into my budget.  I already had olive oil, garlic, chicken broth, and lemon on hand, and I had the Parmesan cheese and fresh thyme left over from the Tuscan White Bean Soup.  So, it actually only cost me about $1.46 per serving for the chicken broth version and $2.33 per serving for the vegetable broth version!  Of course, those numbers don't really give an accurate picture of the cost of the soup as a whole.  I'd estimate $3.79 per serving for the chicken broth version and $4.12 per serving for the vegetable broth version!  Overall, not bad on a budget if you're eating this as a meal, but I'd recommend only having it as an appetizer or side.

Saturday, April 30, 2011

Southwestern Salmon Po' Boys

So, I was originally planning to post about this last Friday, a fish dish in honor of Good Friday, but the internet was out all weekend, so no such luck.

On April 19, the last week of Lent, I decided to try out one of the fish dishes in my crock pot cookbooks.  I've avoided doing these before because fish cooks quickly in the crock pot, so it's not one of those easy ones where you can turn it on before you leave for the day and come back to a fully cooked meal.  But, since it cooks so quickly, fish recipes are ones that you can make when you get home (as long as you don't get home too late).  In order to make this recipe, I made an effort to leave school right at 5:00 p.m. so we could eat around 7:00-ish.

I had picked the Southwestern Salmon Po' Boys recipe from the Crock-Pot Incredibly Easy Recipes cookbook, but I decided to make a half recipe because it says that it serves four and I'm not a big fan of leftover fish.  I did some of the prep work the night before: slicing the red and green bell pepper and onion.  On the way home from school I stopped to get salmon so it would be as fresh as possible.  Now, I'm in the Midwest and going to get the fish was the first time I really missed living on a coast.  During Lent especially, my mom used to go to a nearby fish market to pick up fresh fish on the way home from work for our dinner.  Although our grocery store gets shipments of fish every day, it's just not quite the same.

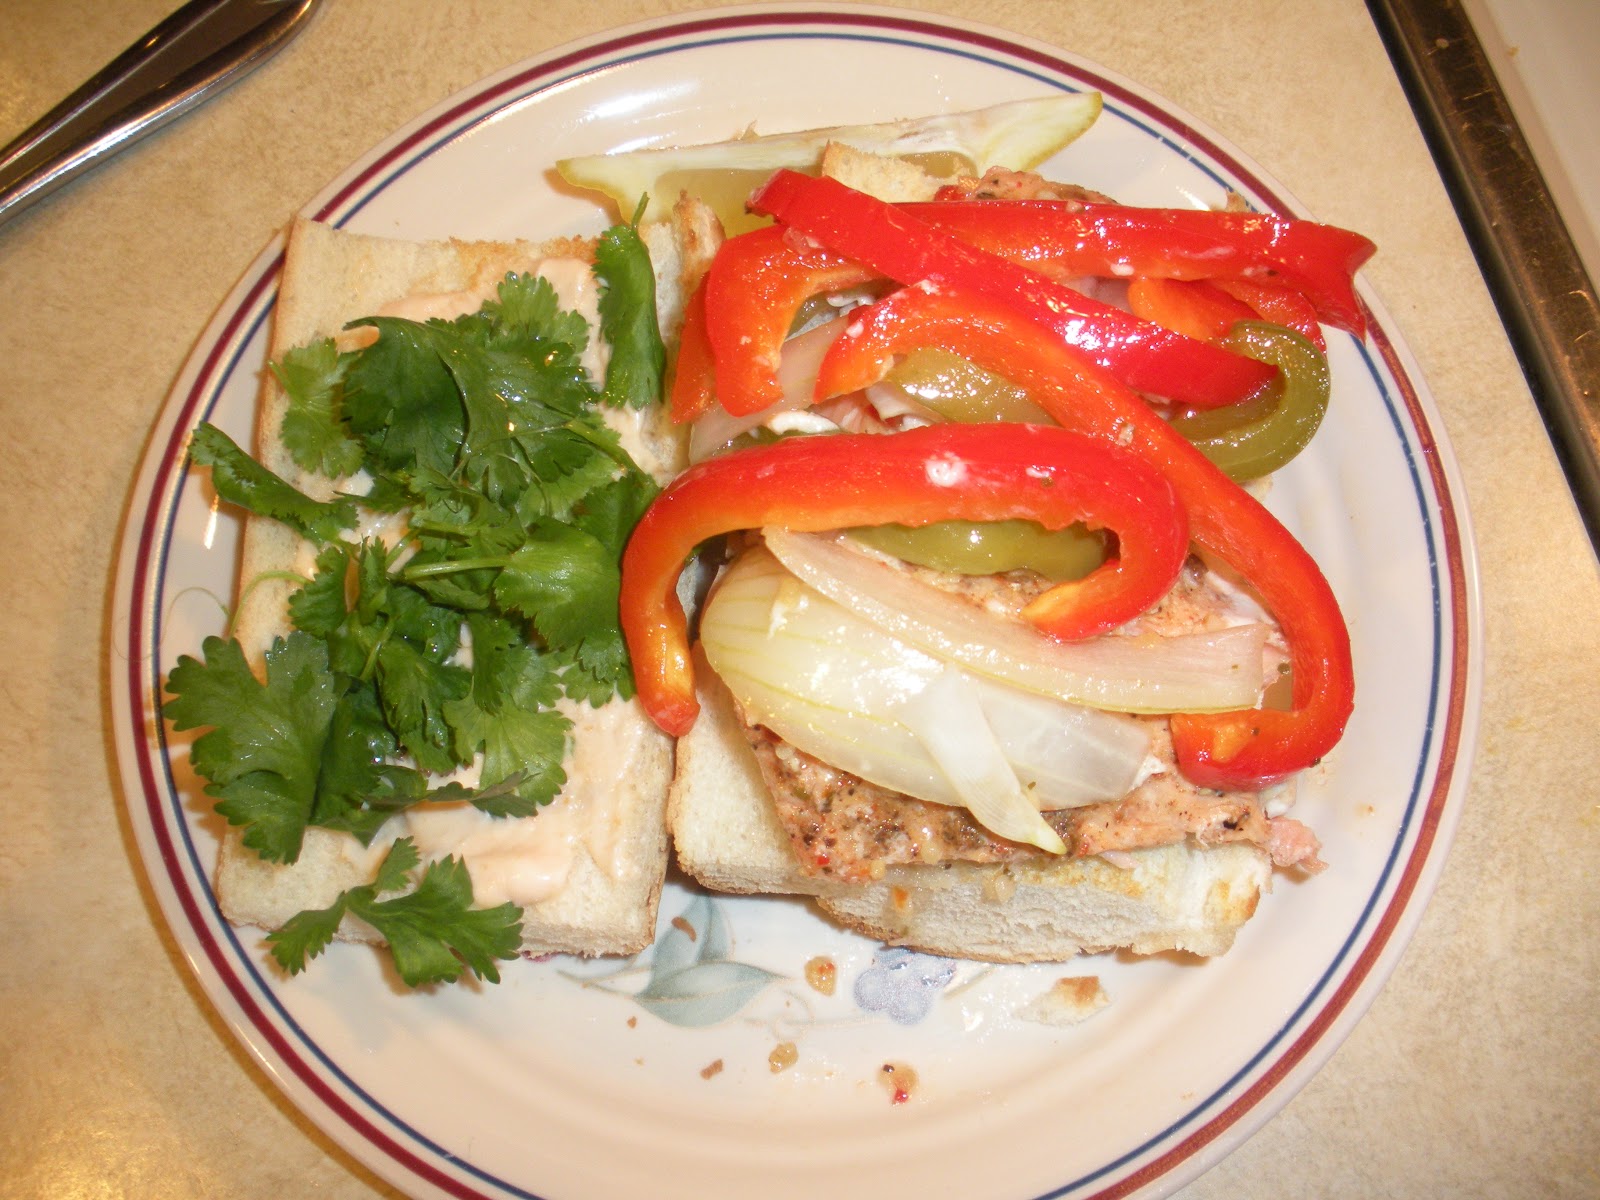
Anyway, you season the salmon with salt, pepper, and "zesty Southwest chipotle seasoning."  That latter ingredient was difficult to find because there was no "chipotle" seasoning.  What I ended up getting was a Southwest seasoning that said it had chipotle peppers in it.  So after seasoning the salmon, you layer it in the crock pot on top of the sliced veggies, then add Italian dressing, another layer of veggies, and some water.  It only cooks for one and a half hours on high.  (The image to the left is actually what it looked like when it was finished cooking.)

While that was cooking, I prepped the toppings for the po' boys.  I sliced and toasted French bread and made "chipotle mayonnaise."  Now, the recipe calls for "chipotle mayonnaise" as one of the ingredients, but I found nothing even remotely close in the grocery store.  The recipe suggests combining plain mayonnaise with adobo sauce if you can't find it in the grocery store and I was lucky that I had purchased peppers in adobo sauce for another recipe the week before so I could make my own chipotle mayonnaise without any extra cost.

After the fish is done cooking, you just have to take it out and assemble the sandwiches.  You spread the chipotle mayonnaise on the bread and add some cilantro.  I removed the skin of the fish before I added it to the sandwich (which is what I was doing in this picture to the left).  You spoon some of the cooking liquid on the rolls, then add the fish and vegetables.  The recipe finally says to "serve with lemon wedge."

Now, I just have to say that this was one of the best things I've done in the crock pot.  I actually regret not trying some of these fish recipes before because the fish cooked perfectly in the crock pot!  And, if you're like me, a little squeamish about your fish being cooked right, this is a great way to do it.  But, as I've come to expect from this cookbook, I got more servings than expected out of this recipe.  Since I halved the recipe, I expected to get two servings, one for me and one for my roommate, but we ended up with three.  I reheated the third serving and had it the next night for dinner and it was still good, but I didn't bother making the sandwich over again.

The cool thing about this recipe, too, is that this is one of the first times where my dish actually resembles the picture in the book!  You can compare the sandwich I made above to the more expertly assembled one to the left (apologies for the flash glare--that was the picture that showed the colors the best), but, most importantly, the food that I made was the same vibrant color used in the image (normally the color in my food looks more bland).

Now, calculating the calories for this will be a little difficult because the amount of Italian dressing that you put in the recipe is not the amount that you actually end up eating.  So my initial calculation was really high, 980 calories per serving, including all the bread and sandwich toppings.  But, in actuality, it's probably closer to 842 calories as a sandwich and 473 for just the fish and veggies by itself (how I ate the leftovers).  So, as published, this recipe is a really high-calorie meal, but if you were to just cook the fish and veggies and eat them without the sandwich fixings, it's not a bad choice.  And even with the sandwich toppings, you could cut calories by using less of the mayo and a lower-calorie roll.  In terms of cost, it seems pretty expensive at first glance.  I mean, I paid $27.40 for the ingredients (about $9.13 per serving!) and I didn't have to get the mayo or adobo sauce!  The fish was the big ticket item at $11.27 for 10 oz, and that is unavoidable, but the Southwest seasoning was also $7.49!  Taking that item off because it's not like I used the whole (big!) jar of seasoning, it ends up being only about $6.34 per serving which is not bad at all for a meal, but definitely not as cheap as some of the other dishes I've made in the crock pot.

Regardless, I've learned how yummy fish cooked in the crock pot can be and will definitely be trying more of these recipes in the future!

Saturday, April 16, 2011

Tuscan White Bean Soup

One of the most natural things to make in the crock pot is soup.  For the graduate student, making soup in the crock pot is especially good: both because you can make it once and have meals for the whole week and because making your own soup is more healthy than getting canned--especially if you don't add much salt.  When I first got back from winter break, on January 18, I made the Tuscan White Bean Soup from The Gourmet Slow Cooker: Simple and Sophisticated Meals from Around the World cookbook.  And actually, another good thing about soup is that it's great to have when you're sick.  I came back from winter break with a cold so the first thing I thought of doing was making soup in the crock pot.

This recipe was perfect for a graduate student lifestyle because most of the prep work can be done the night before, allowing you to just throw everything together in the morning before heading off to school.  The night before you do have to rinse and sort through the beans, then leave them to soak overnight.  Once you've prepared the beans, you can chop all of the other ingredients and stick them in tupperware over night.  Now, apparently if you don't want to soak your beans overnight, you can actually cook them in water in the crock pot for two hours on high to get the same effect.  However, after my experience with the baked beans, I always make sure to soak the beans overnight.  (Note: I understand that this is an irrational connection to make because I did soak the beans overnight when I made baked beans, but that experience still has me a little paranoid.)

Now, all you need to do in the morning is drain the beans and then throw everything together.  I added the beans first, then water (no broth needed, which saves a bit of money for the grad student!), then all the ingredients I chopped the night before: carrots, onion, celery, and garlic.  Finally, you add one sprig of thyme and a can of crushed tomatoes.  Then just turn it on low (for six to eight hours) and you'll come home to some great soup!

This is what it looked like before I turned it on.
And this is what it looked like when it was done cooking.

Now, the cool thing about this recipe is that it does not make you add salt when you're cooking it.  Salt is added, to taste, after the soup is done cooking.  Of course, I didn't add any salt to my recipe.  So it was easy enough to just take the sprig of thyme out and serve the soup, right when I got home.  The soup is garnished with 1 tablesppon olive oil (per serving) and "a sprinkle of [freshly grated Parmigiano-Reggiano] cheese."  Now, as you can see from the image, I may have added more than a sprinkle which ultimately would add to my calorie count, but the cheese was so tasty, I couldn't resist!  In fact, in my cookbook I noted that the recipe was "yummy, especially with the cheese as garnish."  I served it with a large salad and had a great dinner, though you could, of course, add some bread on the side if you wanted something more substantial.

The recipe says that this will serve four to six and I definitely got six servings out of it.  I've actually found that this cookbook is a little more reliable in terms of servings than some of the other crock pot cookbooks I have.  That means that the soup itself is only about 170 calories.  With the garnish you'll add a bit more though because the tablespoon of olive oil is about 120 calories in itself and a tablespoon of the cheese (and I definitely used at least that much) is another 20 calories.  So, for each serving I ate, it was probably about 310 calories.  That seems high for a soup, but if you're having it as your main course with just a salad, you'll be in good shape if you're watching calories (and we all know that the time spent sitting in our cubicles or at home in front of a computer doesn't burn many calories!).  In terms of cost, this was really good on my budget!  When I went shopping, I already had garlic, canned crushed tomatoes, and olive oil at home, so I didn't need to buy those things.  So for this recipe, I only actually paid a little over $2.00 per serving.  The big expense, mostly because I was afraid it would go bad before I used it again, was the thyme at $2.59, which seems like a lot if you're only using one sprig!  Of course, I actually ended up using it in other recipes before it went bad so it ended up not being as big of an expense.  The big expense overall would be the olive oil, but that tends to be an item that you normally have on hand in your kitchen.  I normally get the big jars of olive oil because it's a better deal overall, but then you'd end up paying up to $20.00 (or more) and I'm not going to use that in my calculations because it would throw it off.  You can get smaller jars for around $5.99 and I would assume that if someone were getting olive oil just for this recipe, that's the size that they'd get.  Using that, it comes out to about $3.28 per serving--not too bad at all for a week's worth of dinners on a grad student budget!